|
|
|
|
First of all, thanks to L2 for his guide on earlier
versions. Really helped me get into the botting scene in the first place
^^
I will update it as I find more questions and
answers, if I get the time to 
Please remember that I am not perfect, and I might
make some mistakes along the way. Please tell me if it happens, I will
correct them. Also,
consider the fact that I am french, my english is
not perfect, at all
----------------------------------------------------------------
L2Walker 10.3.x Guide:
----------------------------------------------------------------
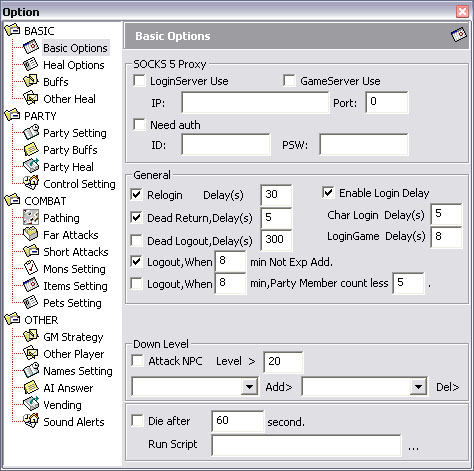
1-The login and main screen
Pretty self-explanatory. USA should
be selected in the white box to the left, then, your NA server in the
second box, then the number of the
character in the third.
The account name and password should be written in
the two boxes right of those.
Login, Logout and Restart are the same as in-game.
BeginCombat will run the bot with your current
settings. (Better if you only run it on the party leader, the one that
picks the mobs and such)
Make sure your bot is fully configured before
clicking this, otherwise I'm not responsible for any unexpected behaviour
^^
Sit will obviously make your character sit, and it
will stand back up once both of its bar are at 100% or the current heal
settings you might
have set.
Basic actions include everything you might have in
your action window in-game. Trades, shops, recommends, etc.
Social are the emotes. Dance, greeting and such.
Right under the login options are your health and
mp bars, as well as current weight and exp, obviously.
Right under those are the hp/mp bars of your
target, along with its name and level, if it's a monster.
Virtual Map, right under the health bars, is an
overview of what is actually happening. In prelude areas, there are even
a terrain overview,
but unfortunately, it's not available in C1 areas
and up.
Monsters will be displayed as Green Squares, Npc's
as Yellow squares, Players as Blue Squares, Party Mates as Dark Blue
Squares and your
target as a Purple
Square. The wide, red square is your
current Radius (The area in which you will get mobs). You can check any
of the options
under it if you wish the map to display Player
names, Monster names, and so on. The slider will zoom in or out the map,
down to a 1:1 scale
or up to a 1:36 scale.
Realmap will display the terrain overview, if available, and Z-Range will
make you see monsters that are within the set Z
coordinates that your character is currently at.
(For example, if I set it at 200, and my char is on a Z coordinate of
2000, it will display any
mobs that have 1800 to 2200 as Z coordinate.)
You can also click combat under the virtual map to
get your combat details - Damage you might have sustained and damage you
have dealt.
The window to the right of the Virtual Map contains
mostly character data.
Char is your character stats.
Party displays your partymates, their hp/mp, level
and class.
Inv displays equipped items as well as inventory
items. Equipped items will be shown with a checkmark on the right of
those.
Skills is a listing of all your skills, active and
passive. You also want to use this window if you wish to use any skills
manually
(Double Click the name of the skill).
Buffs is a listing of all the buffs you currently
have on and their level.
Buddy is a realtime display of your friendlist.
Clan displays all your clanmates, as well as their
level, and class, and offline/online status.
Scripts is for.. well.. running scripts. I wouldn't
recommend messing around with scripts, specially if you have to follow
this guide to use Walker
Scripts are for advanced Walker users.
The lower right window mainly displays information
about your surroundings.
Player will display all the player names within
your vicinity, as well as their class, clan title and exact location. You
can also click their names to
see a resume of their apparent equipements. You can
also double click their name to target them.
Mons lists all the monsters in the
vicinity, as well as their exact location. You can also target a monster
double clicking their name. You can also
right click and set the attack type for these kinds
of mobs - very useful for not attacking chests, as it's the only way I
have found.
NPC will display a listing of all the NPC, and
works the same way as the other two.
Items will display a listing of the items on the
ground. I never tried this, but my guess is that your character will run
to pick them up if you
double click one.
Pets will obviously display all the pets in your
surroundings the same way this window displays monsters and PCs.
Map will display the in-game map, as well as your
current location on it. Very useful to navigate in non-mapped areas
Report is a very useful window. It's a simple report
of all the monsters you have killed, the exp you have made, the levels
you have made,
the items you picked up and your botting time. You
can also clear it by right clicking on the window and selecting Reset.
The lower, larger window is your chat window.
Obviously lists all the chats available in game.
The settings window will allow you to change any
colors of the text in this window, as well as let you set an auto-shout
(For seller dwarves, for example.)
More to come on Setup-Options in the next post. I
hope you enjoy so far.
|
|
|
|
|
|
|
|
|
|
|
|
|
|
|
2-3: Self Buffs
I don't think I need to screenshot this one.. It's
really simple.
Check the squares for the buff lines you want to
use, then select the buff in the drop down menu. You can change the delay
if you want, but most buffs last 1200 secs. (120 secs for dances/songs)
MP
> will make your char buff itself only if its MP
is above the set amount.
With 10.3.x, a new pet checkbox has been added to
the right side. This will make you buff your pet with the selected buffs 
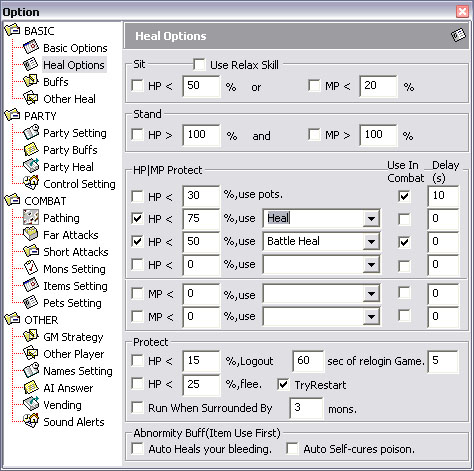
2-4: Other Heals
Other heals aren't really heals, it's the
soulshot/toggle skill menu.
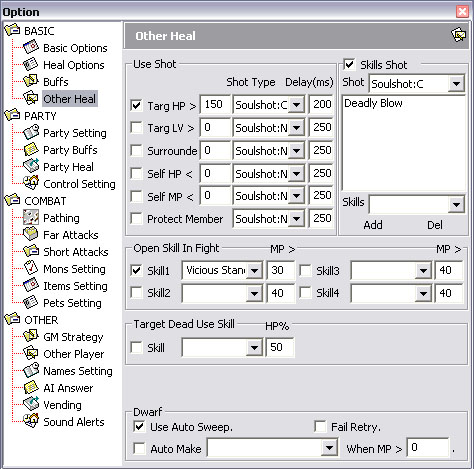
Use Shot menu obviously makes you use Soulshots.
The first line is: If target has over X Health
Points, use [Select type] shot at a X ms delay.
The second one is: If target's level is above X,
use ...
The Third one is: If you are surrounded by X mobs
and up, use...
The Fourth one is: If your HP drops below X Health
Points, use...
The Fifth one is: If your MP drops below X Mana
Points, use...
The Sixth one is: If you're in a situation that
your character needs to protect another member of the party, use...
Skills shot is a nifty new menu that allows to set
shot use for single skills. For example, in the screenshot, I set it to
use Soulshot C before doing a Deadly Blow.
Open Skill in Fights - I've seen a lot of questions
about this, and after testing a bit, I am glad to teach you how it works.
Open skills are basically toggle skills, doesn't
work well for any other types of skills. It will automatically start a
toggle skill before entering combat, and toggle it off after combat. MP
> means that it will only use it if MP is above the set number.
The only use I can see to Target Dead Use Skill is for
the Corpse Life Drain skill. It will make you use skills like this if you
beat a mob and your character is under the set percentage of HP.
In the Dwarf Settings, checking autosweep will make
you spoil a mob -each and every single time- before you attack it, unless
you don't have MP anymore. Fail retry will make you retry it if you fail
your spoil.
Automake is a nifty feature that will make your
dwarf craft the selected item when it is above the set number of MP. Of
course, this saves a lot of frustration when crafting shots and such ^^
|
|
|
|
|
|
|
2-5: Party Settings
Now this is a very, very important part.
** Now modified for 10.3.x changes - this is a big
update for party settings! **
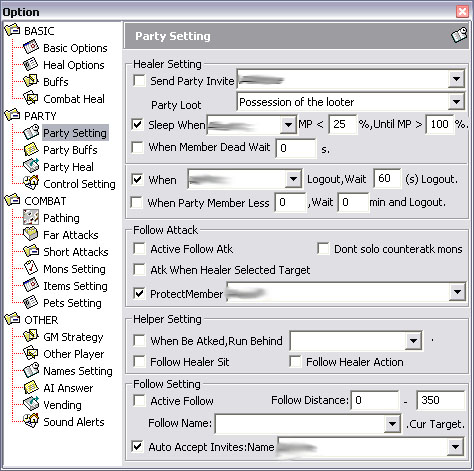
** Note ** All the names you input in here, and
everywhere in the bot are Case Sensitive!!!! That means you have to
respect the lower case letters and the upper case letters if you want it
to work well! otherwise it just won't work and might get you killed!! **
Send Party Invite will make your character
automatically send a party invite to the character you will choose from
the drop-down menu or that you will punch there. Be careful as it may be
annoying for the other person if it's not your character. (For example,
you may spam someone for parties that you forgot to remove from the list
there. Which might annoy him if he doesn't want to party anymore.) I'd recommend
only setting this option if you're inviting one of your characters.
Party Loot is pretty self explanatory: It's the
party loot settings, wether it's random, or turn by turn, or
finderkeepers. Same options as in-game party settings in options
Sleep When XXXX's mp is under XX% and stop once
it's above XX% - Now this is a nifty new feature with 10.3.x. Will make
your char sit, even if the person is out of your party. I believe.
Haven't tried it myself but I doubt they would have made it that way
otherwise I also like the fact you
can check multiple characters in the drop-down list, they
automatically add themselves with a ; at the end of each name.
When member dead wait XX s. - I'm not sure about
this one, if anyone could help me clarify it, I would be grateful. It
might be the set time before your character reacts to resurrect your char
When XXXXX logout, wait XX (s) logout - Will make
your char logout if the selected chars logout after the set period of
time.
When Party Members less than X, wait X min then
logout - When your party has less than X members, your character will
logout on its own after the set period of time
Active Follow Attack will make your character
attack after the character that is set in Active Follow has landed the
first blow.
Attack when healer selected target will make your
character attack as soon as the person set in active follow targets a
monster. (Be cautious when using this Don't
send your tank on mobs it can't handle, and remember that
everything you target will send your character against it, even if you're
just targeting to see the color of the mob. So this requires planning and
knowledge of the environement you're fighting in )
Protect Member makes your character turn against any
monster that are attacking the characters wearing the name you will have
chosen from the drop down menu or punched there yourself. Useful to
protect healers
When be attacked, run behind XXXXX - This will make
your character run around the people with the names you will have chosen
from the dropdown list if it ever gets targeted and attacked. Useful in
conjunction with the Protectmember setting, but be careful as it can
sometimes make you aggro more mobs Use
with caution.
Follow healer sit is to be used in conjunction with
the sleep when helper's MP is lower than XX settings. Have your tank sit
when your healer's MP is low and set your healer to follow your tank and
it's sits. That way, both of your chars will sit at the same time, and
then stand once your healer is full. Very, very, very useful strategy
that all party botters should be aware of
Follow healer action will make your bot imitate any
social action (Dances, Laughs, Greetings) that the characters set in
active follow will perform. Pretty useless if you ask me, unless you
wanna show your friends you are botting
Active follow will make your character follow the
set names there. Very useful setting, as it also determines which people
you will buff out of party and such
Auto-accept invite will make you accept any party
invites from the names you will punch there, or the ones you will select
from the dropdown list.
|
|
|
|
|
|
|
2-6: Party Buffs
This one is fairly simple.
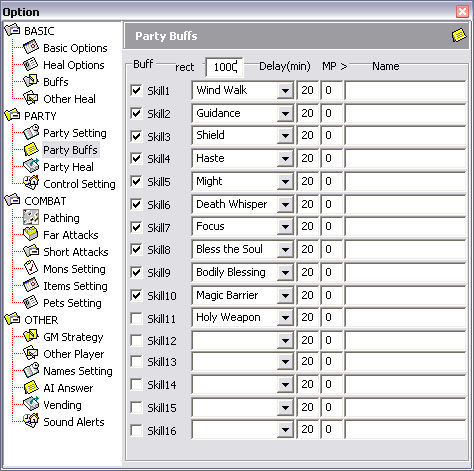
** Note ** Again, please remember that the names
settings are case sensitive and it won't work well if you don't respect
Upper and Lower case Letters!! **
Rect is the distance at which your buffer should
run to buff your character if it is due for buffs I'd recommend 1000, as I've noticed some weird
behavior from my buffer when I set it under 1000.
For the rest, it works just like normal buffs, except
you can input name with ; between each names for specific buffs for each
characters in your party
Check the left checkbox to activate the buff line,
choose the buff from the dropdown menu and set the delay, which should be
left at 20 minutes.
With 10.3.x, a new pet checkbox has been added on
the right side of the names. This will make you buff your partymate's
pets with the checked buffs.
2-7: Party Heals
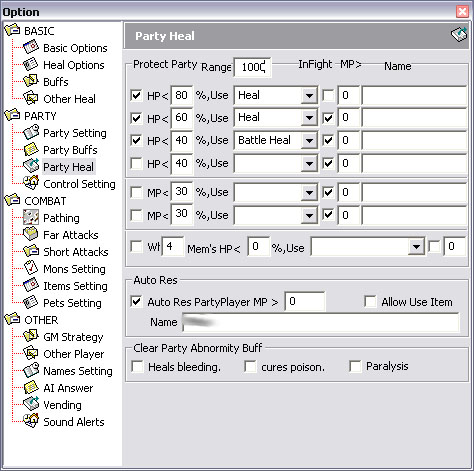
Range is the
range you want your healer running to heal your party members if they are
below the heal settings. Again, I would recommend setting more than your
heal range, since I've experienced deaths often because my healer just
wouldn't heal.
Check the boxes on the left to activate the line.
Set the percentage of Health Points you want your healer to heal your
party at. (Try determining how much percents of the HP of your tank your
healer heals. For example, if your healer heals 441 HP and your tank has
2000 HP, set it at 75-80% so your healer always heals at the right time
to have the best healing/mana ratio while keeping your tank as high in HP
as possible.) Choose the heal from the dropdown menu, check the checkbox
if you want your healer to heal while in fight or not (to avoid pulling
aggro). MP > is to set an amount of MP you want your healer to stop
healing when it is under. For example, if you set 100, your healer won't
heal when he's under 100 mp. (Not recommended :p) You can also set names
here with ; between each of them. (bot1;bot2;bot3)
MP works the same way as HP, except it's for the
recharge spell
The last line should be read this way:
When X or more party members are under X% HP, use
XXXXX skill (Probably Group Heal hint,
hint!  ). Check the checkbox if
you want to use it while fighting and the last box is for
setting the amount of MP you want your healer to be above when you're
using this spell. Again, I don't recommend it ). Check the checkbox if
you want to use it while fighting and the last box is for
setting the amount of MP you want your healer to be above when you're
using this spell. Again, I don't recommend it
Auto-Res doesn't work that well, but bleh, I'll
explain it anyways.
Basically, if you check it, you can set an amount
of MP you want your rezzer to have before rezzing, and you can set a name
in the box. I wouldn't recommend setting names if you use that, it will
do it anyways. You can also check allow item use if you don't have the
skill.
Clear Party Abnormity buffs will make your char use
the appropriate skills if any of your party members gets hit by poison,
bleeding or paralysis.
|
|
|
|
|
|
|
2-8: Control Settings
Now this is fun. Real fun. New feature that I have
been expecting for quite a long time
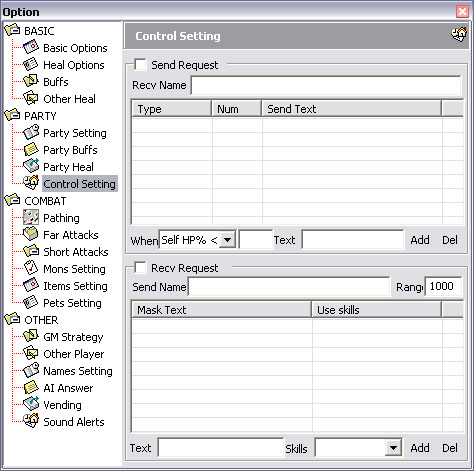
Control settings are basically commands you can
send to your bot to use certain skills. The first box on the top is for
sending commands automatically, and the second one on the bottom is for
setting what to do when receiving a command.
Send request - Check this if you want your bot to
send typed commands on certain conditions.
Recv Name - Type the name of the person you want
your bot to send the command to.
Now from the drop down menu, you can choose a list
of options to use with those commands.
Self HP % < Means if your HP is under a definite
percentage.
Self MP % < ... If you can't understand this one
after reading above, just quit botting
Delay (s) is if you want to set a delay to send the
vocal command periodically. I don't really recommend that
Check Recv Request if you want your bot to react to
certain requests.
Send Name is the name of the person you want your
bot to react to when this particular person sends you a PM.
Range is...
Self explanatory
Text is the received text in PM to react to when
your bot gets it. Then you choose a skill from the dropdown list, and
click add.
Now, for example, if bot #1 is configurated to send
heal to bot #2 each time he drops under 50%, and bot #2 is configurated
to heal each time he receives the command specifically from #1, if #1
drops under 50% hp, it will send a PM to #2 saying heal, and #2 will
automatically target #1 and heal him, even if they aren't in party.
Now, if your healer isn't in party, and you need
buffs from him, if your healer is on active follow, it will buff on its
own once the character that needs buffs get targeted. So just trigger the
targetting by asking a heal out of your healbot, and voila, you got a
free, fully functional powerleveling tool
Of course, you need to set the buffs you want to
use in party buffs first
|
|
|
|
|
|
|
2-9: Pathing
Now I hate these settings, pathing is the worst
part to set as it requires almost constant tweaking, depending on where
you bot
Rand will
make you run around randomly, killing monsters as you see them. Really,
really not recommended, this could very easily get you killed.
Define range is to be used after you have
established many pathing points. If you have ever used walker, you will
notice that when you create pathing points, it draws a black polygon
linking all of the pathing points. Define range will make you hunt mobs
in that range only.
Combat begin is center point will set your combat
ranges from the place where you click begin combat, drawing that familiar
red square around your char
Center point is to be used if you want to determine
a precise point to start combat. Very useful if you plan on botting for
multiple sessions at the same spot. That's not very recommended though
Radii is the unit radius you want your red square
to cover around the Center point. The higher it is, the wider your combat
range will be.
Z Limit is the height limit you want your bot to
get mobs at. Very useful when you are in a multiple floors building. It
will keep your bot from targeting monsters on other floors.
You can check When not found monster, go along the
defined pathpoint if you have pathpoints set. It will make your character
move along the pathpoints you have set when it sees no monsters, but will
stop when it sees one within range of the redsquare and start running
towards it.
The two radio circles you see at the top of the
list are the options to define if you wish to use pathpoints (Points that
your character will run from one to the other when no mobs are around) or
a Range (Like the redsquare, except you set the form).
To set pahtpoints, I would recommend moving to them
yourself, and clicking Cursor Pos, that way, it will set your current
coordinates as a pathpoint. Otherwise, you can enter the coordinates
manually.
|
|
|
|
|
|
|
2-10:
Far And Short Attacks
I haven't fiddled with those much, I never really
needed it, so the information may not be quite accurate, please correct
me if so.
** Corrected for 10.3.x, which is a major update
for those settings as well. **
Both are pretty similar, so I will cover both at
once.
The only difference about them is that when you're
outside of the short attacks range, the far attacks will be considered,
and if you're in range for short attacks, the far attacks will be ignored
and replaced by the short ones.
Check the Use XXXXX Settings square if you want
your settings to work. Otherwise, these settings will be ignored.
Set the range settings, I'd recommend 600 if you're
using long range attacks on far attacks, and 900 if you're a caster
(Spellhowler, Sorcerer or Spellsinger). And I would recommend 60 or so on
short attack settings (melee range), unless you're using a polearm, which
I think has 100 range.
Attack and Run will make your char run after each
attack, wether it be spell or bowshot. Don't use short attack settings with
that, because they just won't work.
You shouldn't need to use the equip weapon settings
either, unless you're using a bow and a dagger. Then just set your bow
from the dropdown menu in far attacks, and check the first box, and do
the same with your dagger in the short attack settings
This is where 10.3.x changes come in. Which is a
very nice update imho in these fields.
First line should be read as: First, use XXXX skill
when my HP is under XX % (setting in 0 will nullify this option) and my
MP is above XX %. Check repeat if it applies.
Second line should be read as: Second, use XXXX
skill when my target's HP is above XXXX. Check repeat if applies
Third line should be read as, Third, use XXXX skill
when my target's hp is UNDER XXXX. Check repeat if applies
Fouth line should be read as: Use XXXX skill if you
are in a situation where you need to protect a party member. Check repeat
if applies
Then, in Attacking type, you can either set your
char to attack normally once he's done with the options above, or you can
set it to chain two skills instead of attacking normally. Please note
that if you set your char to run after it attacks, it will execute its
series of first skills, then execute the first skill in the chain, then
start running. It may have changed with 10.3.x though. Please notify me
if so.
You can check the last checkbox if you want your
char to switch to simple attacks when the mob is under a certain
percentage of health point.
|
|
|
|
|
|
|
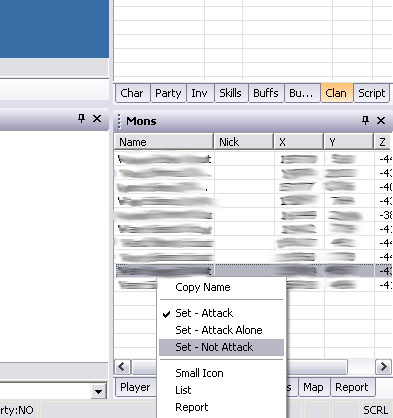
2-11: Monster Settings
Please note that chests don't work in the monster
list. You have to set them to not attack manually in the monster window
of the main botting window. And since there are multiple types of the
same chests, check often to make sure they are still set at not attack.
Now this is a little bit more complicated
First off, on the top, is a list of all the
registered monsters. It gives you a resume of all of their settings. You
can use the find function, but remember that it's case sensitive, so
felim lizardman warrior wouldn't work, you need Felim Lizardman Warrior
Once you selected a mob, its settings appear at the
bottom.
Attack type is to set if you want your character to
attack the mob or not.
Attack alone is a setting to allow it to attack only
if no social mobs with it are standing around. (Someone please confirm
this) Note that this setting doesn't affect if there is an aggro mob
around the mob you are targeting, your little guy will still go for it,
unless you set the aggro mob to attack and set your character to attack
aggro mobs first.
Check auto-sweep if you're running a dwarf, this
will make your dwarf auto spoil/sweet the mob if it's checked in Other
Heals options.
You shouldn't need to touch those, since they are
already set when you first open the bot, but anyways... Check initiative
if you want the bot to think a monster is aggro and check Colony if you
want the bot to think it's social (Someone please confirm about the
Colony one ).
Race is to set which mob your current mob is social
with. For example, all the felim lizardmen are set at 12, which could be
interpreted as All mobs set at 12 are social together and will aggro you
if you attack another mob with clan set as 12 near them.
Mon Level limit is to set a limit to determine
which level mobs your char will attack. The first option is to be checked
and set with the desired number of level difference if you don't want
your char to attack monsters too high for it. Same goes with the lower
checkbox, except it's for lower mobs. For example, if you want your char
to attack only white mobs, you'd check both checkboxes and set them both
at 2. That way, if you are level 22, for example, your char will attack
monsters up to level 24 and down to level 20, but will ignore the lvl 19
monsters unless it gets aggroed by them.
Under Others, attack aggros first should always be
checked. That way your char will go for aggros first which will gives you
a much safer botting experience (less unexpected aggros).
Grab other player's monsters - Will make your bot
KS. Needless to say, I really, really don't recommend this, a lot of
people just don't care about bots, unless they KS. If you want to get
banned/killed/trained/griefed, this is the best way to do it. No one
wants that though, right ?
Again.. :
Please note that chests don't work in the
monster list. You have to set them to not attack manually in the monster
window of the main botting window. And since there are multiple types of
the same chests, check often to make sure they are still set at not
attack.
I consider this very important, allows you to bot
in chest infested areas
Here's a screenshot, to make sure you understand
this statement well:
|
|
|
|
|
|
|
2-12: Item Settings
Haven't really fiddled with those much either,
normally you should just pick up all items
As in Monster Settings, there's a list of all the
items at the top. You need to select an item to be able to change its properties.
You can use the find function, but don't forget it's case sensitive
Setting - Pick will make you pick an item or not
Sell - I'm not sure, someone please clarify this
for me.
Store - I'm not sure either, someone please clarify
this for me.
GM use - Will make you use this item if you detect
a GM. Then again, I am not sure, someone please clarify this for me.
Del - Works
in conjunction with the Auto Del Load function. Again, I am not certain
about this info, someone please clarify it for me ^^
All same button will set all the items to the same
settings of the currently selected item.
Pick up item - Will make you pick up or not items.
You can also set the distance.
Pick up items before ATK. - Will make you pick up
the items on the ground before you attack other monsters.
Only pick mine - Now I wouldn't recommend clicking
this that much, this may seem weird.. Let me explain..
Your bot will sometimes let adena lay about because
it just can't reach it at the moment. Normally, if you would bot in a
populated area, your bot would go for other's drops, but since you follow
the 10 commandments for botting that L2 posted, you don't bot in
populated areas, so most of the time, those drops will be other bot's
drops or your own drops that you missed - you wouldn't want to miss that
neato sword of revolution drop, wouldn't you ? Well this setting gives
you a second chance to pick it if you're passing by again. Anyway, if any
player is playing around you, he should pick up his drops before you have
time to do so. It's a matter of personal opinion anyway I would rather play it like
that, but some people might flame me for that. Well flame
away if you need to
Auto Del Load will make you delete the items you
have checked as Del in the upper
part when your weigh is above the set number of percents.
|
|
|
|
|
|
|
2-13: Pet Settings
I will not get into pet settings since I have never
used a pet in-game as well as on walker myself, and a lot of things
confuse me about it Maybe someone else will be
kind enough to post a guide, or write an
article I could add to my guide.
2-14: GM Strategy
Now this is an important, but pretty simple part.
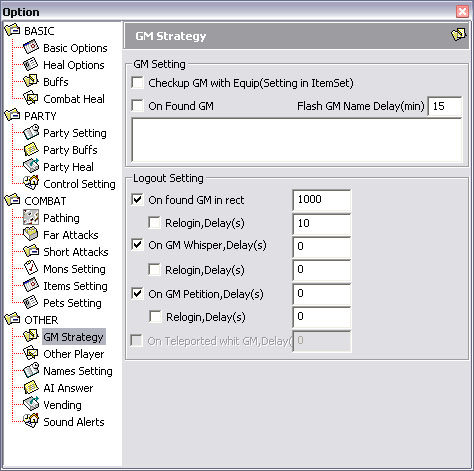
As you can see, I went simple and I just delog when
I see a GM. This isn't very smart, like L2 said in his previous guide.
And I wouldn't recommend it. You will most likely get banned if a GM sees
you force logging off him
Checkup GM item use will make you use the items you
selected for GM use in the Items Settings. I wouldn't recommend using
Scroll Of Escapes, as it's seen as a sign of botting.
I'm not sure what On found GM and flash GM name for
XX min exactly do, if someone could clarify to me, it could greatly help
me Thank you.
On found GM in rect - If a GM is within the set
range of your player, you will automatically disconnect. I don't
recommend relogging in. I don't recommend ever botting again if you get
out of this. I also recommend transferring all your stuff to clan
warehouse and make sure another one of your friends in your clan picks it
up and keeps it in his private warehouse. And get a new account, and reroll.
On GM whispers - Will make you log off if a GM
whispers you. Then again, same recommendations goes about relogging in...
On GM petition - Will make you logoff if a GM
petition you. Now I don't have to say it again about relogging, right ?
|
|
|
|
|
|
|
2-15: Other Player Settings
A very important part..
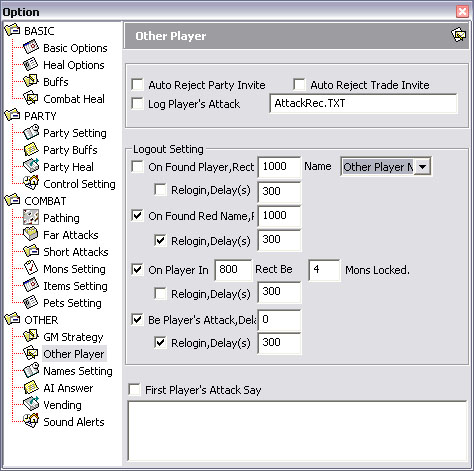
Auto-Reject Party invite: Never ever check this.
This will make it obvious you are botting if you reject party invite
within a millisec. If you don't check it, the party invite will just go
after a while.
Auto-Reject Trade invite: I've never seen anyone
use this to detect for botting. But just to be on the safe side, leave it
unchecked.
Log player attack will allow you to keep a log of
all the attacks you have sustained from players. It gives out the name of
the attacker as well as the HP you had left after the attack. It outputs
in the text file you will have chosen there.
On found player in rect: YOU ABSOSHOLUTABELY
WANT TO CHECK THIS IF YOU ARE AFK BOTTING!!! Now I don't recommend
AFK botting, but this is a good way not to get banned if you do it. You
can set the relogin delay as long as you want, the longer, the better. In the name drop-down box,
the first one will make you de-log if it sees any
blacklisted name, and the otherone will make you delog if it sees any
non-friend names.
On found red name in rect: Will make you unlog if a
red name appears within the set distance... Useful if you're not AFK
botting and haven't set the Delog on found player in rect option. You can
also set the relogin time.
On player in XXXX rectangle be X Mons locked:
Should be read as If a player inside a XXXX units radius has X monsters
aggroed on him, delog. This prevents trains on you Again, you can set the relogin time. If you set
these options, set them so you delog if someone has exactly the right
amount of mobs you can handle. For example, if you can handle maximum 3
aggroes, well make it delog when someone comes near with 3. Don't take
any chances
Be player's attack delay: Will make you delog on
player attacks after the set delay. You can also set relogin options.
The last box is for setting something that your
player will say after being attacked once
|
|
|
|
|
|
|
|
|
|
|
|
|
2-16: Names Setting
I don't think I need to screenshot that either.
It's fairly simple.
GMList is the list of names your bot found out
using the /gmlist command, which will then be used to determine if a GM
is around you/PMs you, to take appropriate action.
Friends Name is basically your /friendlist.
Other Players Name is a list that you can use to
make your bot disconnect upon seeing this player, though you can remove
the option in Other Players settings
(That might be wrong, please correct me if so)
Black Name is your blacklist, which will make you
disconnect upon seeing the names listed there.
2-17: AI Answers
I won't get into this because anyone who has a
minimum of brains (which you should have while you're botting) won't use
AI Answers.
It's one of the best way for people to find out
you're botting..
2-18: Vending
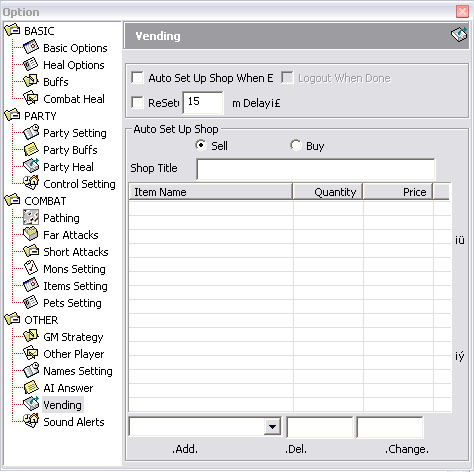
Very nice for vending a lot of stuff.
The first option at the top will make you set up
shop after relogging in.
The second option will make you restart shop every
time the set amount of time passes. Which is very useful to move down the
list. I will explain.
The list lets you add as much items as you feel
like. You can choose the item to sell from the dropdown menu, then set
the quantity and price, then click add to add it to the list.
The max number of items you can sell in a shop is
four. But with the restart shop option, when your bot restarts the shop,
it will always take the four items at the top of the list.
So if you sold two items, you'll have two new items
in your shop when your bot resetups shop. Pretty neat for selling huge
amounts of stuff.
The two buttons on the right will allow you to move
your selection up and down in the list.
2-19: Sounds Alerts
I don't think I need to screenshot that either.
Just make sure that you have all sounds alerts on at all time, this could
save you.
You might want to use a louder and more annoying
sound than the one provided on walker. I used a like 15 seconds duration
alarm sound to make sure I would hear it.
I repeat, always have -all- your sounds alerts on,
unless you don't care about the account you're botting.
2-20: Conclusion
Now, you're finally done and all set up. Remember
that AFK botting will eventually get you banned.
With this understood, I wish you an happy
experience botting and wish you for the best of the lucks. If you have
any questions, please don't post them here.
Try PMing me instead I
will try to answer them the best I can on
this post so I can share the answer with everyone else that might need
it.
|
|
|
|
|
|
|
** 3- FAQ **
On this post, that I will often edit, I will post
all of the most frequently asked questions for which I have working
solutions, in the hope it will help reduce the useless posts on
the forum from little kids who don't use search
3-1: How do I change the protocol version ?
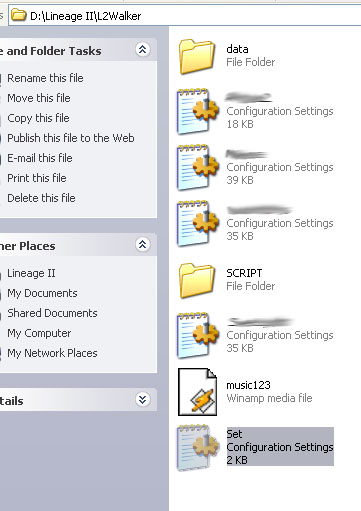
It's fairly simple. Open your L2Walker folder. If
you can't get that far, well quit botting now
In your L2Walker folder, you should see a text file
named Set.ini
Now open this file, and fine the lines that look
like this:
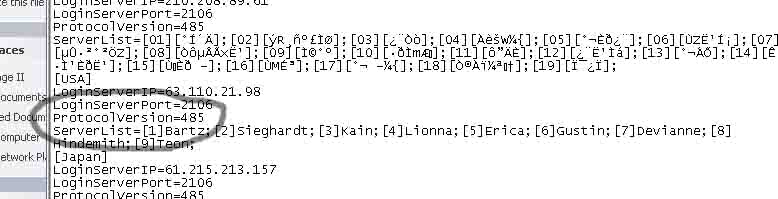
Now, in this screenshot, the protocol version is
alright.
But if you need to change it, the current protocol
version is 485.
If you can't open the set.ini file because windows
won't let you, right click on the file, click on properties. Now, in this
window, you should see a line where it's written Open With:. Click the
change button at the end of this line, and pick notepad from the list Here ya go,
hope this helps.
|
|
|
|
|